The new Accounting tab is designed to fully support and enable your accountant to automate all reconciliation activities into one dedicated section.
This new tab can be used with or without connecting your accounting software. However, to take full advantage of this feature, it’s best to connect to the ERP. As a connected user, you’ll be able to both sync and export company transactions, while unconnected users can only export them.
There are many notable features in the Accounting tab, let's see them below.
Configure Accounting Rules
Located in the Setting option, the Accounting Settings option allows you to manage various fields, such as GL Accounts, Tax Rates, and Tracking Categories for selection in the Accounting Table. It also enables you to create rules that automatically apply these field selections to new lines based on the details of each line. Configuring these options will save you a significant amount of time and effort.
⇾ GL Codes
The first step in the automation process is selecting which GL codes will be available in the mapping and field dropdowns. Any GL accounts that should not be selectable in the Accounting tab should be toggled off at this stage.
Users connected to an ERP will see their General Ledger automatically populated, and imported directly from their ERP. Unconnected users can either manually input their GL accounts or import them via a .csv file.
⇾ Tax Rates
Similar to the GL codes selection, Tax Rates will also be available in the mapping and field dropdowns. Any Tax Rates that should not be selectable in the Accounting tab should be toggled off at this stage.
Users connected to an ERP will see their Tax Rates automatically populated, and imported directly from their ERP. Unconnected users can either manually input their GL accounts or import them via a .csv file.
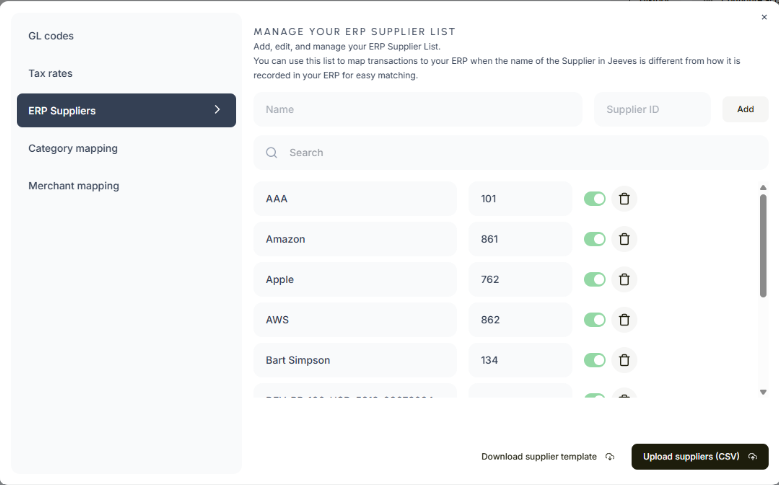
⇾ ERP Supplier
Available to those without an ERP connected, this tab allows users to upload their list of Suppliers from their ERP so that an exact match can be made more easily when exporting from the Accounting tab and uploading that .csv to their ERP. Users can either manually input their GL accounts or import them via a .csv file.
⇾ Category Mapping
The Category Mapping tab allows users to associate merchant categories with specific GL accounts. When a new line is added in the Accounting tab, Jeeves will use the merchant's business classification to populate the Jeeves Category column. If a GL account has been mapped to that merchant category in the Category Mapping tab, the corresponding GL account will automatically be filled in for the user on that line.
⇾ Merchant/Vendor Mapping
Although Category Mapping will handle most mappings accurately, certain vendors may require custom mappings. The Merchant/Vendor Mapping tab allows users to set custom mappings for specific vendors, which will override any existing category mappings.
Users will have the ability to map an ERP Supplier, GL Account, and Tax Code per merchant/vendor, having these values filled in automatically whenever a transaction is made. In addition, these mappings will be automatically filled in for any unmapped values when a user syncs or exports a transaction line with this information, meaning less manual mapping tasks for users.
Search & Filter
There is a search bar at the top of the table that will search through the Vendor columns for partial matches.
Available filters include a date filter with quick filter options, Jeeves Categories, Merchants/Vendors, and GL Codes.
Prepare and Sync to ERP
A drop-down button called Book is located at the top right of the table, allowing you to sync the selected transactions with your connected ERP. This dropdown will contain three options: Sync Ready, Export Ready, and Export All. Each option will display the number of transaction lines it applies to next to it.
Once synced or exported from the Book dropdown, transaction lines will be updated to the status of ‘Booked’ and will be filtered out of the Accounting table view. Users can view previously booked transactions by toggling the Show booked transactions filter.
The Export All option will not update the transaction status to Booked.
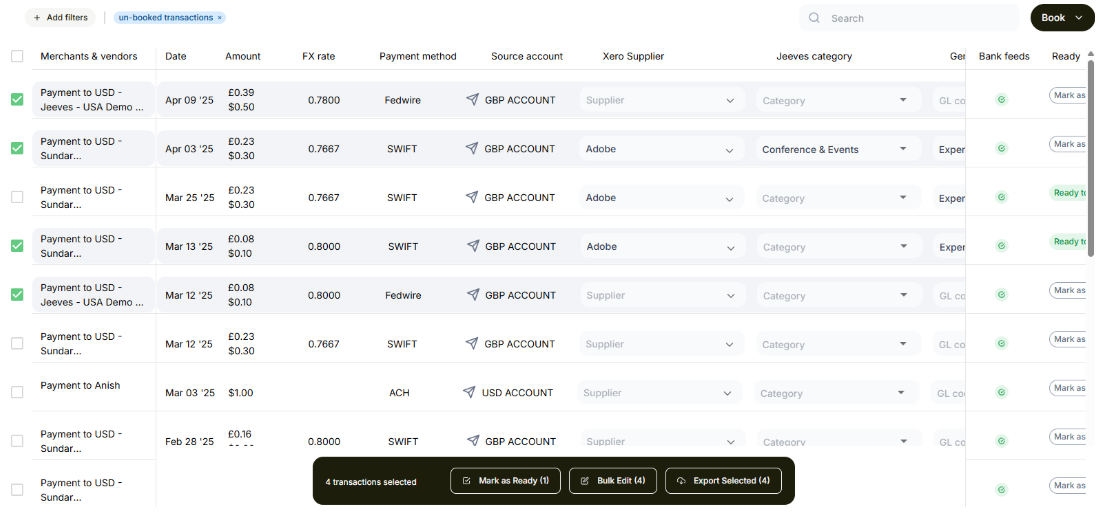
Bulk Action Toolbar
On the left-hand side of the Accounting table, you will see checkboxes beside each transaction line. Selecting one or more of these checkboxes will cause the Bulk Action Toolbar to appear at the bottom of the page. The toolbar will show how many lines are selected, along with a few bulk actions that can be done on the selected lines. These actions are: Bulk Edit, Mark as Ready, and Export. They will also show the number of lines each action applies to.
⇾ Bulk Edit will open a pop-up window that will allow users to select editable fields for all the selected lines. Make the selections on the fields you wish to update and select Save. Those selections will be reflected for all selected lines in the Accounting table.
⇾ Mark as Ready will mark all selected lines as Ready to be Booked, as long as they have the requisite mandatory fields filled out, allowing them to be readied.
⇾ Export will export a .csv file with the information of all selected lines. This action will not update the status of the selected lines, and can also be done to previously booked lines.
File Export
You can export the file as .csv, and it will reflect the same information contained in the accounting table. It will also include additional information such as ID and ExportedBy. You can import the file into the ERP of your choice as a new transaction record.
Sync & Export History
The History tab provides an activity log of all sync and export actions performed on this page, allowing you to track changes, review past actions, verify data integrity, and troubleshoot discrepancies.
Bank Feed Status
Bank Feeds are currently only available for NetSuite and Xero, however, they are coming soon for QuickBooks as well.
If you have connected to an ERP, there will be a Bank Feed Status column on the right side of the table, next to the sync status, that indicates whether transactions are waiting to sync to the Bank Feed, or if they have already synced. Transactions waiting to sync will have an orange timer symbol, while synced transactions will have a green checkmark. If a transaction line fails to sync, it will be marked with a red icon, and the sync will be reattempted the next time a sync is initiated.
The Bank Feed will automatically sync to your ERP in the background once every 60 minutes.
If you encounter any issues or have further questions, feel free to reach out to our support team for assistance.